
TL;DR
Moving your rig into a closet and sealing gaps can dramatically cut noise and echo without expensive foam. Proper placement, ventilation, and sealing are the most effective steps for a quiet, usable workspace or recording booth.
Ever wonder why some closet setups sound surprisingly good while others are a chaotic echo chamber? The secret isn’t just about slapping foam everywhere. It’s about smart placement, sealing gaps, and understanding the physics of sound. You can turn a tiny closet into a surprisingly effective workspace or vocal booth — or make it worse by ignoring basic principles.
This guide will show you how to tame noise, reduce echo, and keep your gear cool. Whether you’re building a dedicated recording nook or just trying to quiet a high-powered AI rig, the right moves make all the difference.
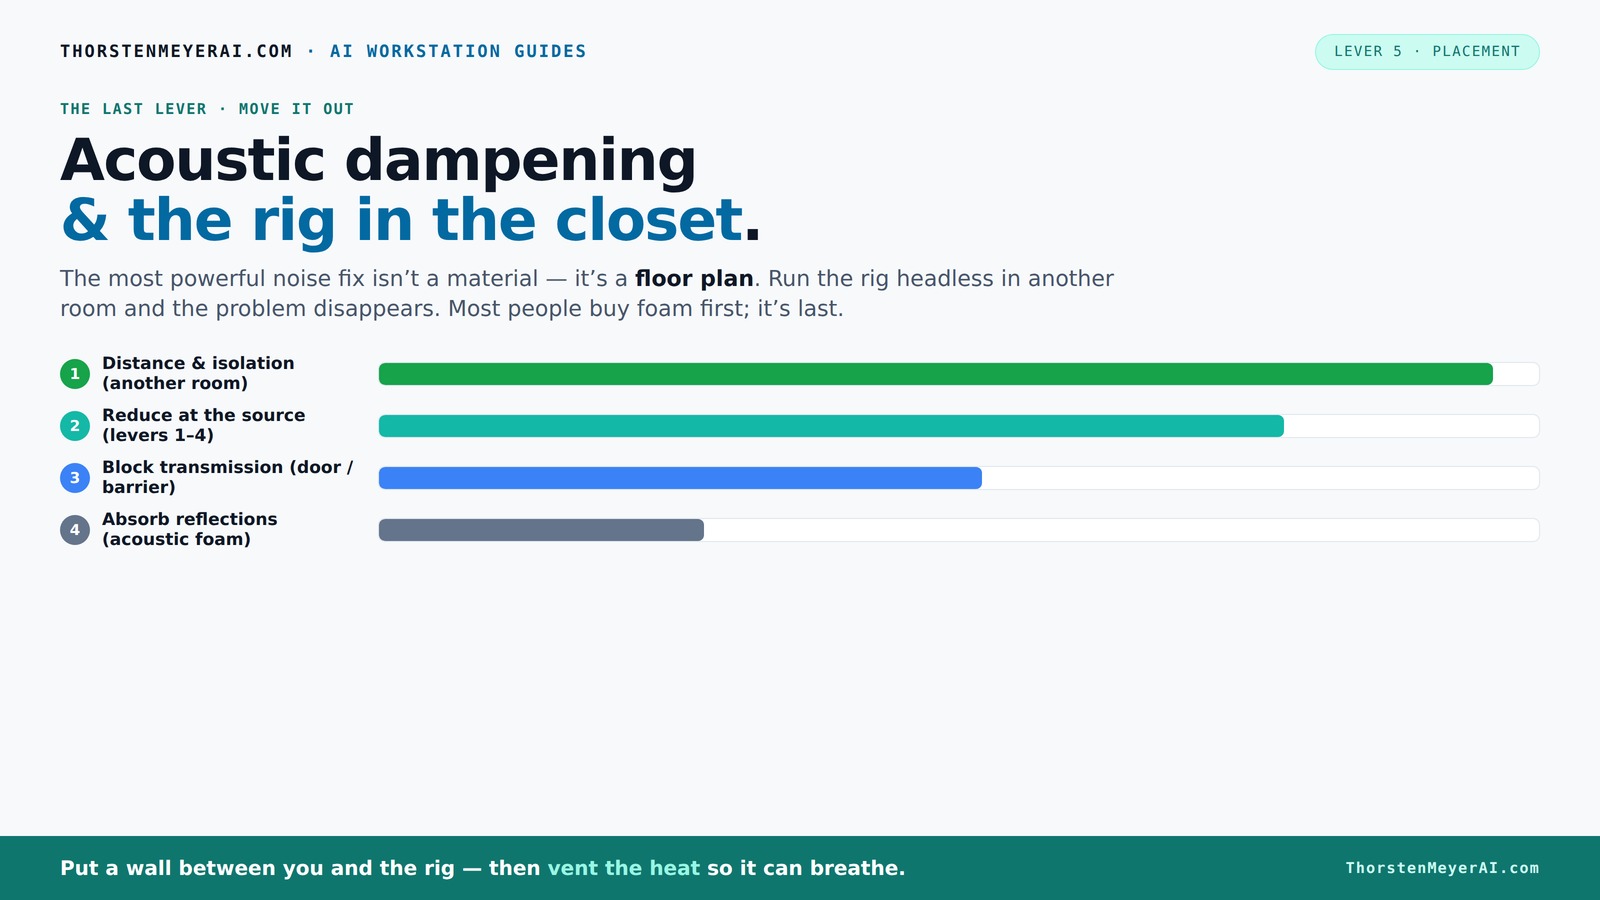
Acoustic dampening
& the rig in the closet.
The most powerful noise fix isn’t a material — it’s a floor plan. A rig you can’t hear because it’s in another room beats any amount of foam. Tap the approaches in Part 1 to see what actually works.
(another room)
(levers 1–4)
(door / barrier)
(acoustic foam)
Contain the noise, not the heat
Key Takeaways
- Moving your rig into another room is the most effective noise reduction method — don’t rely on foam alone.
- Ventilation and airflow are critical — sealed closets trap heat, risking performance and hardware longevity.
- Proper mic placement and reflection treatment trump random foam panels for sound clarity.
- Sealing gaps around doors and vents drastically cuts outside noise leaks.
- Bass trapping in small spaces prevents muddy, boomy low-end sound.

Focusound 52 Pack Acoustic Foam Panels 1" x 12" x 12" Sound Proof Foam Panles Soundproofing Noise Cancelling Wedge Panels for Home Office Recoding Studio with 300PCS Double-Side Adhesive
- Soundproofing Design: Triangular grooves for noise absorption
- Includes Adhesive Tape: 300pcs double-sided adhesive for easy installation
- Easy Shape Recovery: Reforms after soaking in water
As an affiliate, we earn on qualifying purchases.
As an affiliate, we earn on qualifying purchases.
Why Moving Your Rig Is the Best Noise Fix (And the Easiest)
Putting your rig in another room is the single most effective way to cut noise. Think of it like this: a loud machine sitting in a closet can still be heard through the door or gaps. But if it’s in a separate space, the sound doesn’t reach you at all.
For example, I set up my AI server in the basement, miles away from my desk. The noise vanished. I just SSH in, and it’s like I have a silent, powerful computer. This approach works great for AI workstations because they don’t need to be right next to you.
All you need is a good network connection and some ventilation. The noise problem becomes a non-issue, freeing you from expensive soundproofing and treatment.
The 'Rig in the Closet' Setup — Why It Works and Its Big Caveat
Putting a high-power rig inside a closet is a popular hack. It’s cost-effective, easy, and keeps noise out of your main workspace. But here’s the catch: heat. A sealed space traps warmth, especially with a GPU pulling 600W or more.
Imagine a closet with a powerful AI server. Without airflow, the temperature rises quickly — the fans spin faster, noise gets worse, and throttling kicks in, reducing performance. Not ideal.
The key is providing enough ventilation: vents, exhaust fans, or even ducting. Purpose-built soundproof cabinets often combine acoustic lining with active airflow to keep things cool while blocking noise. Check out this [guide on cooling and noise](https://thorstenmeyerai.com/reduce-heat-noise-ai-workstation/); it explains how to balance sound and heat dissipation.
Choosing the Perfect Closet — Size, Material, and Placement
Not every closet is equal. For a quiet setup, size and construction matter. Larger closets with thick walls and good airflow are better. Smaller, thin-walled closets are tougher because sound leaks and low-end buildup can become a problem.
Look for a closet with dense walls, minimal gaps, and enough space for ventilation. A walk-in closet with a door you can seal tight beats a tiny closet with gaps around the door. The goal is to turn your closet into a semi-enclosed, controlled space.
And don’t forget placement: keep your gear away from the door and walls where reflections bounce and muddy your sound. For example, I placed my mic away from the back wall, facing the center of the closet, then treated the wall behind it for reflections.
Where to Place Acoustic Panels and Absorbers in a Tiny Closet
Placement matters more than just throwing foam on every surface. For more on optimal placement, see this guide. In a small closet, the first step is mic positioning. Aim to put the mic at a reflection point — usually a few inches away from the wall behind it.
Next, treat the wall behind the mic, the side walls, and the ceiling. Use broadband panels—think 2-inch thick for small spaces, 4-inch for bigger or bass-heavy rooms. This reduces echo and boxiness.
For example, in my closet booth, I mounted foam panels at the reflection points identified by a mirror trick: holding a mirror on the wall to see where your mic 'sees' sound bouncing back. Covering these spots cut echo and made my recordings clearer.
Sealing the Door and Gaps for Better Soundproofing
Gaps around the door are the weak link in any closet setup. You can learn more about sealing techniques in this related article. Sound leaks through cracks, making your effort pointless. The fix? Weatherstripping, acoustic sealant, and heavy curtains or blankets around the door.
For instance, I used weatherstripping on my closet door frame and sealed the edges with acoustic caulk. It cut down sound leakage by a solid 70%. When I closed the door with blankets around the edges, the room was practically silent outside.
Remember, a sealed door and gaps are your first line of defense against outside noise and echo bouncing back into your mic.
Handling Low-End & Bass Buildup — Do You Need Bass Traps?
Small, enclosed spaces often suffer from low-frequency buildup, making vocals muddy or boomy. Consider adding bass traps for better sound quality. The solution? Bass traps and broadband absorption in corners and along walls.
In my closet, I added a thick foam panel in the corner behind the mic. It helped tame the low-end muddiness, giving clearer vocals. If you notice a 'boxy' sound or boominess, it’s time for bass traps.
While small closets don’t need full bass trap setups like bigger studios, a few strategically placed broadband panels and corner traps can make a big difference.
DIY Tips, Common Mistakes, and Budget-Friendly Fixes
Building a closet booth doesn’t have to cost a fortune. Use blankets, rugs, and pillows to start. Stretch blankets over the door and walls for quick, cheap absorption. DIY acoustic panels can be made from foam or mineral wool wrapped in fabric.
Beware of blocking airflow or sealing so tightly that heat becomes a problem. Also, avoid relying solely on foam panels without sealing gaps. Proper placement and sealing are more effective.
For example, I used an old duvet to cover the door and some leftover foam panels. It’s not perfect but drastically cut echo and noise.
What Your Closet Can and Can’t Do — Realistic Expectations
A closet setup can significantly improve your sound quality and reduce outside noise. But it’s not fully soundproofing. Expect some residual echo, especially at low frequencies, and outside noise leakage if gaps aren’t sealed.
It’s ideal for vocal recordings, podcasts, and quiet AI work. But don’t expect total silence or perfect bass control without professional treatments and custom solutions.
Think of a closet booth as a smart compromise: a cost-effective, quick fix that improves your workflow without turning your space into a professional studio.
Frequently Asked Questions
Is acoustic dampening the same as soundproofing?
No. Acoustic dampening reduces echo and reflections inside a space, but it doesn’t block sound from escaping. Soundproofing involves sealing gaps and using dense barriers to prevent sound leaks.
Where should I place acoustic panels in my closet booth?
Start with reflection points — the wall behind the mic and the ceiling. Use a mirror trick to find where sound bounces. Cover these spots with broadband panels for best results.
How much of the closet should I cover with treatment?
Cover key reflection points and the ceiling. You don’t need to line every wall. Focus on areas where sound bounces back directly into the mic, plus corners if low-end buildup occurs.
Do I need foam, blankets, or both?
Use a combination. Foam panels target mid and high frequencies, blankets help with overall absorption, and rugs reduce floor reflections. Layering materials gives the best noise and echo control.
Can I build a good vocal booth without fully soundproofing the closet?
Yes. Proper placement, sealing gaps, and adding absorption can dramatically improve sound quality. Complete soundproofing is expensive and complex — a well-treated closet can be very effective for most needs.
Conclusion
In the end, a closet rig is about smart compromises. Distance and sealing matter more than any foam. When you treat your space like a tiny, controlled environment, you’ll be surprised how much better your recordings and work sound.
Before you spend a dime on foam, ask yourself: can I just put this somewhere quiet? The best soundproofing is often just putting space between you and the noise.